
One of the key challenges that businesses (specifically marketers) face today is cobbling a set of systems together to gather the data needed to make informed decisions. This blog post reviews how we completed an integration between HubSpot and WordPress to help us gather the data to provide a higher level of service to existing channel partners and prospective partners.
The goal of this blog is not to promote any particular product or service (HubSpot and WordPress do that quite well on their own), but rather to show others that integrating HubSpot’s marketing platform into WordPress is a lot easier than it seems. With a little research and persistence, you can connect your WordPress CMS (or any other PHP-driven CMS) to your HubSpot marketing platform to pass data through your contact forms.

Connecting WordPress to HubSpot
The AwesomeCloud Services website is powered by the WordPress CMS. WordPress is a fantastic platform with a wide variety of pre-built plugins that enable a jack of all trades to launch an enterprise-class website that’s on par with websites developed by much larger organizations.
That’s great – we all love WordPress and appreciate the plugins/themes etc., but how in the world do you integrate your WordPress website with your HubSpot account? Put another way, when people fill out a form on your website, you want that data to pass into HubSpot, lock, stock and barrel. You want their contact information and you also want to see which webpages they’ve viewed so that your team has the correct data needed to have relevant conversations. Here’s how you make it happen.
Step 1: Installing the HubSpot Tracking Code
The first part of this process is relatively simple. Add your HubSpot tracking code to your website in the same way that you would with your Google Analytics tracking cookie. You’ll need HubSpot’s tracking cookie installed so that you can pass web analytics (traffic source / keyword) data into HubSpot. You can find your HubSpot tracking code at the very top of the “Report Settings” page that is found under Reports.
![]()
Installing HubSpot’s tracking code is usually accomplished by copying and pasting the tracking code into your header or footer file. See below.
![]()
Step 2: Passing Data From Your Website to HubSpot Using a HubSpot Form
There are several ways to pass contact data from your WordPress CMS into HubSpot – each with varying levels of control and aesthetics. Since we wanted to maintain our WordPress CMS and also benefit from HubSpot’s functionality, we opted to make use of the HubSpot form to pass data. The upside is that we can alter our HTML form to our heart’s content. The downside is that we lose the ability to pre-populate existing values and leverage smart fields. If you’re not a technical person, you’ll probably need a developer’s assistance to implement this step of the process. If you are a technical person and you want to take a crack at this yourself, we have a screenshot below of the PHP code we’re using to accomplish the HubSpot and WordPress integration.
HubSpot’s Form looks more intimidating than it really is. Once you have the basic code (see below), you can quite efficiently pass data into HubSpot. You’ll just need to include your HubSpot Portal ID and form GUID in your specific API. You can find your form GUID by looking at the URL when you edit your form within HubSpot.
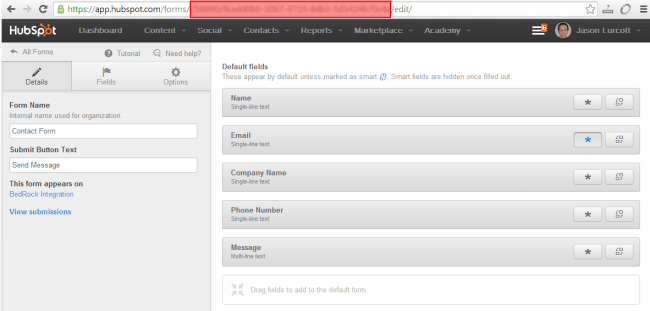
Grab the part of your URL highlighted in red (see above) and copy that down into the blurry section of the code that’s listed below. Your HubSpot portal ID (also known as your account number) can be found in the upper right-hand side of your HubSpot settings page. Download a copy of this PHP code.
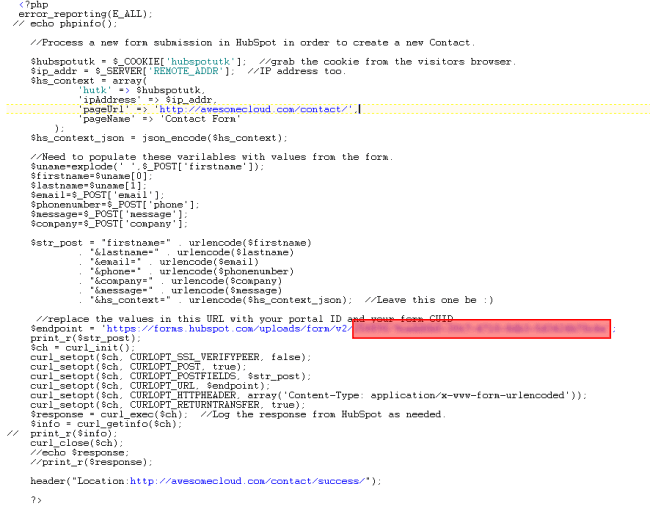
We have the above code stored in a PHP file that our form calls after you click the submit button. You’ll just need to add the action attribute of the form to call a PHP file that you create with the above code. Download a copy of this PHP code.
The HTML form markup looks something like this:
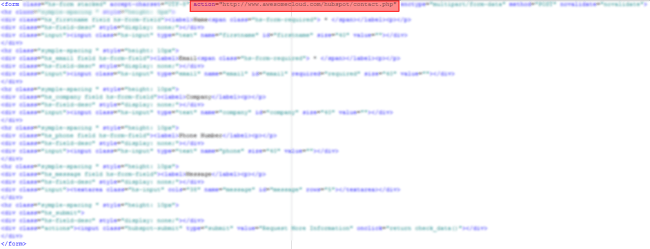
Pay special attention to the action attribute within the form. Download a copy of this form HTML.
You can also use HubSpot’s embed option, which executes some JavaScript on your webpage to render the form. It works, but you lack the aesthetics of using your own form.
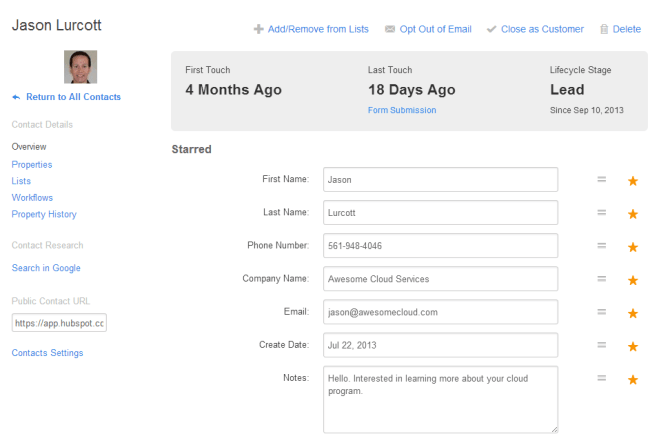
Step 3: Viewing Results
If the above example works for you, then you should see a new contact created in your HubSpot database after a user submits a form. Your workflows should then kick off and you’ll be off to the races. It’s a pretty quick process, so you should see the new contact data hit your HubSpot database within a few moments.
That’s it! If you have WordPress and HubSpot, the above blog should provide you with all the information that you need to quickly integrate your systems. Have a question? Feel free to drop me a line on Twitter by using the @awecloud handle. I hope this blog was useful and that it saves you many hours of the grief that we have vicariously paid forward on your behalf.
Want to hire a developer to take care of this for you? Drop us a line through Twitter by using the @awecloud handle, and we can get you in touch with the developer who helped us. Using HubSpot and Zoho? Check out our guide on completing a HubSpot Zoho Integration.